Monday, July 4, 2016

Nagios - Memory Check Plugin

Thought this might be of use to some one.

Originally sourced from Nagios Directory

Centos 7


#!/bin/bash
if [ "$1" = "-w" ] && [ "$2" -gt "0" ] && [ "$3" = "-c" ] && [ "$4" -gt "0" ]; then
FreeM=`free -m`
memTotal_m=`echo "$FreeM" |grep Mem |awk '{print $2}'`
memUsed_m=`echo "$FreeM" |grep Mem |awk '{print $3}'`
memFree_m=`echo "$FreeM" |grep Mem |awk '{print $4}'`
memBuffer_cache_m=`echo "$FreeM" |grep Mem |awk '{print $6}'`
memAvailable_m=`echo "$FreeM" |grep Mem |awk '{print $7}'`
memUsed_m=$(($memTotal_m-$memFree_m-$memBuffer_cache_m))
memUsedPrc=`echo $((($memUsed_m*100)/$memTotal_m))||cut -d. -f1`
if [ "$memUsedPrc" -ge "$4" ]; then
echo "Memory: CRITICAL Total: $memTotal_m MB - Used: $memUsed_m MB - $memUsedPrc% used!|TOTAL=$memTotal_m;;;; USED=$memUsed_m;;;; BUFFER/CACHE=$memBuffer_cache_m;;;; AVAILABLE=$memAvailable_m;;;;"
exit 2
elif [ "$memUsedPrc" -ge "$2" ]; then
echo "Memory: WARNING Total: $memTotal_m MB - Used: $memUsed_m MB - $memUsedPrc% used!|TOTAL=$memTotal_m;;;; USED=$memUsed_m;;;; BUFFER/CACHE=$memBuffer_cache_m;;;; AVAILABLE=$memAvailable_m;;;;"
exit 1
else
echo "Memory: OK Total: $memTotal_m MB - Used: $memUsed_m MB - $memUsedPrc% used|TOTAL=$memTotal_m;;;; USED=$memUsed_m;;;; BUFFER/CACHE=$memBuffer_cache_m;;;; AVAILABLE=$memAvailable_m;;;;"
exit 0
fi
else # If inputs are not as expected, print help.
sName="`echo $0|awk -F '/' '{print $NF}'`"
echo -e "\n\n\t\t### $sName Version 2.1###\n"
echo -e "# Usage:\t$sName -w -c "
echo -e "\t\t= warnlevel and critlevel is percentage value without %\n"
echo "# EXAMPLE:\t/usr/lib64/nagios/plugins/$sName -w 80 -c 90"
echo -e "\nCopyright (C) 2012 Lukasz Gogolin (lukasz.gogolin@gmail.com), improved by Nestor 2015\n\n"
exit
fi

Old Version


#!/bin/bash
if [ "$1" = "-w" ] && [ "$2" -gt "0" ] && [ "$3" = "-c" ] && [ "$4" -gt "0" ]; then
FreeM=`free -m`
        memTotal_m=`echo "$FreeM" |grep Mem |awk '{print $2}'`
        memUsed_m=`echo "$FreeM" |grep Mem |awk '{print $3}'`
        memFree_m=`echo "$FreeM" |grep Mem |awk '{print $4}'`
        memBuffer_m=`echo "$FreeM" |grep Mem |awk '{print $6}'`
        memCache_m=`echo "$FreeM" |grep Mem |awk '{print $7}'`
        memUsedPrc=`echo $((($memUsed_m*100)/$memTotal_m))||cut -d. -f1`
        if [ "$memUsedPrc" -ge "$4" ]; then
                echo "Memory: CRITICAL Total: $memTotal_m MB - Used: $memUsed_m MB - $memUsedPrc% used!|TOTAL=$memTotal_m;;;; USED=$memUsed_m;;;; CACHE=$memCache_m;;;; BUFFER=$memBuffer_m;;;;"
                exit 2
        elif [ "$memUsedPrc" -ge "$2" ]; then
                echo "Memory: WARNING Total: $memTotal_m MB - Used: $memUsed_m MB - $memUsedPrc% used!|TOTAL=$memTotal_m;;;; USED=$memUsed_m;;;; CACHE=$memCache_m;;;; BUFFER=$memBuffer_m;;;;"
                exit 1
        else
                echo "Memory: OK Total: $memTotal_m MB - Used: $memUsed_m MB - $memUsedPrc% used|TOTAL=$memTotal_m;;;; USED=$memUsed_m;;;; CACHE=$memCache_m;;;; BUFFER=$memBuffer_m;;;;"
                exit 0
        fi
else # If inputs are not as expected, print help. 
sName="`echo $0|awk -F '/' '{print $NF}'`"
        echo -e "\n\n\t\t### $sName Version 2.0###\n"
        echo -e "# Usage:\t$sName -w <warnlevel> -c <critlevel>"
        echo -e "\t\t= warnlevel and critlevel is percentage value without %\n"
echo "# EXAMPLE:\t/usr/lib64/nagios/plugins/$sName -w 80 -c 90"
        echo -e "\nCopyright (C) 2012 Lukasz Gogolin (lukasz.gogolin@gmail.com), improved by Nestor 2015\n\n"
        exit
fi
 

Thursday, December 10, 2015

Managing your Samba - Active Directory

So how do you  manage the samba active directory setup? does it have a front end?

The easiest way to administer an Active Directory is by using Microsoft RSAT (Remote Server Administration Tools) on a Windows machine.

"samba-tool" already contains many features for common administration jobs, but compared with the RSAT, it is still missing many options. Another big advantage of using RSAT, it increases the available documentation (books, online, etc.), because it's the common way Windows administrators are doing these tasks.

 Download and install RSAT from microsoft website and setup using - Add or remove windows programs feature from control panel.

Installation:

  •  Install RSAT using the downloaded installer
  • Open "Programs and Features" (use the "Start Menu/Metro search to locate the tool).
  • Open "Turn Windows features on or off"
Depending on the administrative tasks you want to perform, you choose the features to install. The following are recommended options to be installed for Samba Active Directory installations:

Most of the RSAT tools hide content and menu options in their default setting. To enable all features and display the whole content in each program, go to the "View" menu and activate "Advanced Features". Typically this option is only visible, when you've marked the root of the tree view.


Ref:


Hope this helps :)


Setup your free Active Directory in linux :)

Hey Guys!

So we had to decommission our Active Directory server as it was running on pretty old hardware and win 2003. With the cost factor involved we decided to give linux based domain controller a try. All my initial thoughts was to use ldap as thats what we normally refer to as AD alternative for linux, unfortunately things were not as easy as it seemed to be. we could only add linux machines or users to the ldap and the guy who manages the system ( who provisions machines and user accounts ) found it difficult to use ldap frontend.

So there started the search for something simpler and easy to manage and voila here comes SAMBA 4. Samba 4 ?? are you crazy its used for sharing files to windows machines how can you even compare it with Active Directory! its true :) I am just quoting the details from samba wiki here as its very much informative.

Things to look out for

1. DNS - super important as everything depends on how dns setup is configured. So extra care needs to be done while this is setup. Almost 90% of issues arises due to incorrect DNS setups
2. Use of static IPs instead of dhcp.

Explanations for the links shared below.

1. This one pretty much helps you setup the primary DC
2. The second link helps you to setup a failover/setup

Ref:

1. Setup a Samba Active Directory Domain Controller
2. Join an additional Samba DC to an existing Active Directory
3. Check and fix DNS entries on DC joins

Hope this helps ;)

Check out the blog for more details on how to manage the Samba DC from a windows machine like you do with Active Directory.

Monday, August 31, 2015

Python + pkg_resources.DistributionNotFound:

This usually occurs if your python setuptools are old version. I tried upgrading them and the errors are gone :)

pip install --upgrade setuptools

For those who want the latest stable version use the above command or you can try yum to install python-setuptools

Hope it helps! 

error: Python.h: No such file or directory

Okay guys so I was trying to install locust using pip and the installation was failing due to the following error.

"error: Python.h: No such file or directory"

Found out that the python devel package was not installed and hence the error. So I installed the devel package and voila.. things were back on track :)

So in general if you find that something.h file is missing or not found, it usually means that the devel packages are not installed.

#yum install python-devel

Hope this helps someone :)

Friday, November 7, 2014

system failure: POST failed, status=413 upload too large: file '/': upload too large -- Restoring Large Zimbra backups

Okay so zimbra account restoration for large accounts ( above 1GB ) was not working for me. the following steps helped to restore large accounts.

What you need to do is  to change parameter rest_request_max_upload_size to a larger value. Here we will change it to 10GB.

# su zimbra
# /opt/zimbra/bin/zmlocalconfig -e rest_request_max_upload_size=10737418240
#  zmmailboxdctl restart
# exit

Then run the import backup account like this as root user.

# /opt/zimbra/bin/zmmailbox -z -m "email@domain.com" postRestURL "//?fmt=tgz&resolve=reset"  backupfile.tar.gz

Thanks to Andrea for the tip :)

ref url: LINK

Wednesday, August 20, 2014

Ruby installation issue with openssl

So i was trying to install ruby 1.87 and the compilation broke due to openssl issue. The error was something like this.

ossl_pkey_ec.c: In function ‘ossl_ec_group_initialize’:
ossl_pkey_ec.c:761: warning: assignment makes pointer from integer without a cast
ossl_pkey_ec.c:815: error: ‘EC_GROUP_new_curve_GF2m’ undeclared (first use in this function)
ossl_pkey_ec.c:815: error: (Each undeclared identifier is reported only once
ossl_pkey_ec.c:815: error: for each function it appears in.)
make[1]: *** [ossl_pkey_ec.o] Error 1
make[1]: Leaving directory `/usr/local/src/ruby-enterprise-1.8.7-2012.02/source/ext/openssl'
make: *** [all] Error 1
So applied this patch to the openssl file in the extracted ruby source and finally the compilation was successfull. You will need to specify the location of the ossl_pkey.ec.c file in the below file or you can mention it while patching.


--- ruby-1.8.7-p374/ext/openssl/ossl_pkey_ec.c  2010-06-21 04:18:59.000000000 -0500
+++ /root/ruby-1.8.7-p374/ext/openssl/ossl_pkey_ec.c    2013-12-10 13:30:18.919963527 -0600
@@ -757,8 +757,10 @@
                 method = EC_GFp_mont_method();
             } else if (id == s_GFp_nist) {
                 method = EC_GFp_nist_method();
+               #if !defined(OPENSSL_NO_EC2M)
             } else if (id == s_GF2m_simple) {
                 method = EC_GF2m_simple_method();
+               #endif
             }

             if (method) {
@@ -811,8 +813,10 @@

             if (id == s_GFp) {
                 new_curve = EC_GROUP_new_curve_GFp;
+               #if !defined(OPENSSL_NO_EC2M)
             } else if (id == s_GF2m) {
                 new_curve = EC_GROUP_new_curve_GF2m;
+               #endif
             } else {
                 rb_raise(rb_eArgError, "unknown symbol, must be :GFp or :GF2m");
             }

Change your location to the ruby source directory and save the contents to a file named patch.txt. then issue the following command to patch.

#patch < patch.txt

Hope this helps :)

Wednesday, August 6, 2014

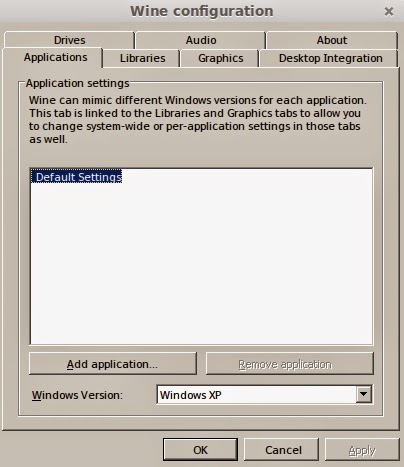
For those who have Issues running Microsoft Office 2007 on Wine.

So I had to remove my windows altogether and run linux. I choose the latest stable release of Mint 17, i need to have ms office installed and figured out the wine package should handle this fine. however it was not smooth as i thought.

Installation was fine. But the excel and power point was not opening and had trouble. So here is something that I did made it work for me.

1. Open the wine configuration ( gui --> Configure Wine ) and select the windows version to be "windows xp"


2. Check the libraries tab next, you will need to add  a new override for the library, choose "riched 20" and click add. Then you need to edit this newly added override and change the load order to "native ( windows )" 

 
 Apply the wine configuration and then try launching the powerpoint or excel, it should work :)


Monday, August 26, 2013

Nagios - Hosts Disappear

Well I had configured my nagios setup and everything seemed to be fine, then i noticed something strange! The hosts keep disappearing time to time. They do come up at an odd time but not always. Well lot of time was spent on configurations analyzing what went wrong and what ! no LUCK!! :(

So to all those who has this problem, here's something that you might want to check for. Such an issue arises due to more number of nagios PIDs, ie the shutdown of previous nagios was not proper and that PID is messing up with the new one. So to troubleshoot stop nagios, check for orphaned PIDs.. kill it and start nagios again. Voila the hosts started appearing with no issues again!! :)

[root@server ~]#    ps -ef | grep -i  nagios
nagios   23581     1  0 Aug22 ?        00:00:00 /usr/local/nagios/bin/nagios -d /usr/local/nagios/etc/nagios.cfg
nagios   24686     1  0 Aug19 ?        00:00:01 /usr/local/nagios/bin/nagios -d /usr/local/nagios/etc/nagios.cfg
root     29749 27976  0 07:14 pts/0    00:00:00 grep -i nagios

[root@server ~]#    /etc/init.d/nagios stop

[root@server ~]#     ps -ef | grep -i  nagios
nagios   24686     1  0 Aug19 ?        00:00:01 /usr/local/nagios/bin/nagios -d /usr/local/nagios/etc/nagios.cfg
root     29760 27976  0 07:14 pts/0    00:00:00 grep -i nagios

[root@server ~]#     kill -9 24686

[root@server ~]#     ps -ef | grep -i  nagios
root     29762 27976  0 07:14 pts/0    00:00:00 grep -i nagios

[root@server ~]#     /etc/init.d/nagios start
Starting nagios: done.

[root@server ~]#     ps -ef | grep -i  nagios
nagios   29791     1  0 07:14 ?        00:00:00 /usr/local/nagios/bin/nagios -d /usr/local/nagios/etc/nagios.cfg
root     29795 27976  0 07:14 pts/0    00:00:00 grep -i nagios

Thursday, June 6, 2013

Hard Disk Cloning - Data Recovery

Okay, you can use various Linux commands that can be used to clone the hard drive. This can be helpful while recovering data.

 dd

The simplest program to clone.

Usage:

dd if=/dev/sda/ of=/dev/sdb

It will copy partition table and boot loader and all partitions within this disk

Here "if" option specifies your input and "of" specifies your output.
Make sure that both hard disks are of the same size.

How to get the status of disk cloning. Open a new terminal and issue the following commands.

# pgrep -l dd
56452 dd

# kill -USR1 56452 

Here the first command will out put the process id of the dd command and the second command will make dd throw the output in the same shell where its running.

Hope it helps.
 

Tuesday, December 11, 2012

Postfix + DKIM setup


Installation

1) Get the rpmforge repo and install it.

# wget http://pkgs.repoforge.org/rpmforge-release/rpmforge-release-0.5.2-2.el6.rf.x86_64.rpm
# rpm -ivh rpmforge-release-0.5.2-2.el6.rf.x86_64.rpm
# yum install opendkim postfix

2) stop sendmail and remove from auto start.
# /etc/init.d/sendmail stop# chkconfig remove sendmail

3) add postfix and opendkim to the autostart pool
# chkconfig postfix on# chkconfig opendkim on

4) configure postfix.
# vi /etc/postfix/main.cf

configuration options: change the following or comment out the existing and add accordingly.
myhostname = server.yourdomainname.com ( your server hostname )mydomain = yourdomainname.commyorigin = $mydomaininet_interfaces = allmydestination = $myhostname, localhost.$mydomain, localhost, $mydomainhome_mailbox = Maildir/

Add the following for DKIM in postfix main.cf
smtpd_milters = inet:localhost:8891non_smtpd_milters       = $smtpd_miltersmilter_default_action   = acceptmilter_protocol   = 2

5) configure Opendkim


Configuration files of OpenDKIM

1. /etc/opendkim.conf – OpenDKIM’s main configuration file
2. /etc/opendkim/KeyTable – a list of keys available for signing
3. /etc/opendkim/SigningTable – a list of domains and accounts allowed to sign
4. /etc/init.d/opendkim — Service start up file.
# vi /etc/opendkim.conf

Configuration options:

PidFile /var/run/opendkim/opendkim.pidMode    svCanonicalization        relaxed/simpleSyslog  yesSyslogSuccess   yesLogWhy  yesUserID  opendkim:opendkimSocket  inet:8891@localhostUmask   002Selector        defaultKeyTable        refile:/etc/opendkim/KeyTableSigningTable    refile:/etc/opendkim/SigningTableExternalIgnoreList      refile:/etc/opendkim/TrustedHostsInternalHosts   refile:/etc/opendkim/TrustedHosts

# cd /etc/opendkim

We will create the public and private keys now.

# cd keys# mkdir yourdomainname.com; cd yourdomainname.com# opendkim-genkey -d yourdomainname.com -s default

here -d denotes your domain and -s is for selector.
# chown opendkim.opendkim ../yourdomainname.com -R

# cd ..# vi KeyTable

default._domainkey.yourdomainname.com yourdomainname.com:default:/etc/opendkim/keys/yourdomainname.com/default.private
# vi SigningTable
*@yourdomainname.com default._domainkey.yourdomainname.com

# vi TrustedHosts
127.0.0.1localhostserver.yourdomainname.comyourdomainname.com

Note: ensure that localhost is mentioned in TrustedHosts file.

Now we are ready to test this. Start opendkim first and then postfix.
# /etc/init.d/opendkim start# /etc/init.d/postfix start

Ensure that OpenDKIM logs has written on mail log file. This is the only file where you ca see any issue with the opendkim errors.
# tail -f /var/log/maillog

Sep 20 09:43:50 server opendkim[8535]: OpenDKIM Filter v2.5.2 starting (args: -x /etc/opendkim.conf -P /var/run/opendkim/opendkim.pid)


Add the DNS records to your domain name. You can get the public dns record from the following file. This is TXT record.
# cat /etc/opendkim/keys/mydomain.com/default.txt

ensure to add  a "k" ahead of ;=rsa; by default it will be without k, after the mentioned changes the dns record will have ;k=rsa;
default._domainkey IN TXT "v=DKIM1;k=rsa; p=MIGfMA0GCSqGSIb3DQEBAQUAA4GNADCBiQKBgQDJmb2F+hGx+/1Y4dadbsTzg/thhJVsZHT5chFhaoZH6SMALX6J9IIIPSW3NRsap/mUQQ5GVG9IHIBfpAsIJr8CILOVcqAWQbG5XTn9Sk1p76abg3tyR01rhSTG2CljLmkNAPqOSrE5uUEXRq1T+eGhS1EVHFWmQ5lF8ZAyoyEHewIDAQAB" ; ----- DKIM default for yourdomainname.com


Important : Don’t forget to set SPF record that may boost the email delivery.

Send out a test email and verify.
# echo " This is a test mail " | mail -s "OpenDKIM test mail" mygmail@gmail.com

If everything goes well you see a messages “DKIM-Singnature header added” in mail log.
# tail -f /var/log/messages

Sep 20 09:47:33 server opendkim[8535]: 33040108639: DKIM-Signature header added (s=default, d=yourdomainname.com)Sep 20 09:47:33 server postfix/qmgr[2390]: 33040108639: from=, size=3016, nrcpt=1 (queue active)Sep 20 09:47:33 server sendmail[8671]: q8KDlXa9008671: to=mygmail@gmail.com, ctladdr=user@yourdomainname.com (503/503), delay=00:00:00, xdelay=00:00:00, mailer=relay, pri=32554, relay=[127.0.0.1] [127.0.0.1], dsn=2.0.0, stat=Sent (Ok: queued as 33040108639)Sep 20 09:47:33 server postfix/smtpd[8636]: disconnect from GF-P-server.yourserver.com[127.0.0.1]Sep 20 09:47:34 server postfix/smtp[8642]: 33040108639: to=, relay=mailin-04.mx.aol.com[205.188.146.194]:25, delay=1.3, delays=0.1/0/0.24/0.95, dsn=2.0.0, status=sent (250 2.0.0 Ok: queued as 05217380000B9)Sep 20 09:47:34 server postfix/qmgr[2390]: 33040108639: remove 


Check the email header for confirmation : you should see dkim= pass


Hope this helps :)

Saturday, October 13, 2012

Quick Setup KVM aka Kernel-based Virtual Machine

Well, I thought this was something difficult, but trust me its not brain twister to setup the virtual machines using KVM.

Note: This tutorial assumes you understand the basics of linux and aware of the commands usage.

Ok here is how I setup the same.

1. Install CentOS 6  ( minimal Installation )
2. Turn of selinux

# vi /etc/selinux/config

make the following change.

SELINUX=disabled 
Now reboot your machine to have this applied.

3. Update the system using yum

4. Install packages for Virtualization to work.

# yum install -y openssh-server openssh-client qemu-kvm  libvirt bridge-utils virt-manager.x86_64  virt-top.x86_64 screen

5. Lets setup the network now. For the kvm to work, we will need to setup bridge network. The following is the configuration options.


[root@server ~]# cat /etc/sysconfig/network-scripts/ifcfg-eth0
DEVICE="eth0"
NM_CONTROLLED="no"
ONBOOT=yes
HWADDR=00:01:6C:53:82:72
BRIDGE="br0"
[root@server ~]# cat /etc/sysconfig/network-scripts/ifcfg-br0
DEVICE="br0"
NM_CONTROLLED="no"
ONBOOT=yes
HWADDR=00:01:6C:53:82:72
TYPE=Bridge
IPADDR=192.168.1.10
PREFIX=24
GATEWAY=192.168.1.1
DNS1=8.8.8.8


4. Save the settings and open a screen to restart the network.

# screen -S network
# /etc/init.d/network restart
5. Now you should see the bridge network up and running.

6. Start libvirtd

# /etc/init.d/libvirtd start

Oops. it did not start for me :D here's what was missing

#  yum -y install avahi

Now libvirtd will start..

7. Copy an ISO to your home directory so that we can use this for creating Virtual Machines, we will be using centos here.

8. Create your VMs now

# virt-install --name=server_name --ram=512 --arch=x86_64 --vcpus=2 --location=/home/packages/CentOS-6.0-x86_64-bin-DVD1.iso  --os-type=linux --os-variant=rhel6 --file /home/images/server.img  --nonsparse --nographics -s15 --extra-args='console=tty0 console=ttyS0,115200n8' --prompt
9. Use Man pages for exact options.

Hope this helps :)


Friday, February 17, 2012

Unable to install applications using GEM

I faced an issue today, I was trying to install a package using gem command but ended up in the following error


Building native extensions.  This could take a while...
ERROR:  Error installing cassandra:
        ERROR: Failed to build gem native extension.
/usr/bin/ruby extconf.rb
mkmf.rb can't find header files for ruby at /usr/lib/ruby/ruby.h

So in order to fix this you need to install the ruby-devel package.

you can use yum or rpm or which ever you are comfortable with.

Wednesday, December 14, 2011

cPanel + mysql slow queries to TABLE_SCHEMA

If you are seeing the following in mysqladmin proc for a long time then its basically cPanel calculating account disk usage from the information_schema, this tends to increase the load on some servers.


| 14436 | root           | localhost | mysql          | Query          | 2227 |                    | SELECT TABLE_SCHEMA as DB,SUM(DATA_LENGTH)+SUM(INDEX_LEN
GTH) AS SPACEUSED from information_schema.ta |

You can place the following in your cpanel conifg (/var/cpanel/cpanel.config) to force /scripts/update_db_cache to utilize a `du` style disk calculation. This should help you.

use_information_schema=0

restart cpanel once done :) 

Sunday, November 27, 2011

Unable to mount hard disk/Partition

Yesterday I faced a strange issue, after rebooting the server I noticed that our back drives did not mount automatically. The fstab entries were proper but still the device did not mount. I tried manually

# mount /dev/sdb1 /backup

unable to mount /dev/sdb1 /backup busy or already mounted.

Googled a lot but did not find any fix, checked if the raid setup was causing the issue since we had raid setup sometime back ( although it was not in use )

Did the following to fix this ( try as a last attempt if no other method works :D )


root@server [~]# dmsetup ls 
ddf1_4035305a0590430220202020202020201d9400003a354a45   (253, 2) 
VolGroup00-swap (253, 1) 
VolGroup00-root (253, 0) 
root@server [~]# dmsetup remove ddf1_4035305a0590430220202020202020201d9400003a354a45 
root@server [~]# dmsetup ls 
VolGroup00-swap (253, 1) 
VolGroup00-root (253, 0) 
root@server [~]# mount /dev/sdb1 /backup 


root@server [~]# df -h


/dev/sdb1             276G  223G   39G  86% /backup 


Hope this helps :)

Saturday, November 20, 2010

Cpanel upcp error

Issue: root@server [~]# /scripts/upcp --force
/scripts/upcp syntax OK
Running Futex Check/Fix......Done
Undefined subroutine &Cpanel::Update::automatic_updates_enabled called at /scripts/upcp line 273.

Solution: wget -O /root/updatenow.static http://httpupdate.cpanel.net/cpanelsync/RELEASE/scripts/updatenow.static && perl /root/updatenow.static --manual

Then run /scripts/upcp --force.

It should fix it!!

Wednesday, October 27, 2010

mount/Unmount a partition in Linux

I was trying to umount a partition, it gave me error saying the device is busy and un mount was not working. I then started to troubleshoot this and came to the conclusion that something was still accessing the partition and hence the Linux was not allowing me to unmount it. So what do you do to know what process is using this? There are couple of command utilities that can assist you in this. One is lsof and the other one is fuser,  so how do you use this? lets see that below.

# lsof /dev/sda2

 or
 
# fuser -m /dev/sda2

it will list you the process that is using that partition, either stop the process or kill it and then you can umount it. Hope it helps ;)

Friday, October 1, 2010

Recovering files/settings from a cPanel server from a Harddisk failure/Crash


Bad things happen...Same is the case with a server, Suppose you have a cPanel server and one fine morning, you get this alert.. Site DOWN!!!

oops your hdd crashed? well dont panick... contact your datacentre and get the same OS installed on a new hdd, lets do the data recovery real fast!


Once the server is UP with new OS, install cPanel and connect your old hdd as slave and mount it to /oldHD


# mount /dev/sdb1 /oldHD

Run these rsync commands to move everything over;


# rsync -vrplogDtH /oldHD/usr/local/apache/conf /usr/local/apache
# rsync -vrplogDtH /oldHD/var/named /var
# rsync -vrplogDtH /oldHD/home/* /home
# rsync -vrplogDtH /oldHD/usr/local/cpanel /usr/local
# rsync -vrplogDtH /oldHD/var/lib/mysql /var/lib
# rsync -vrplogDtH /oldHD/var/cpanel /var
# rsync -vrplogDtH /oldHD/usr/local/cpanel/3rdparty/mailman /usr/local/cpanel/3rdparty
# rsync -vrplogDtH /oldHD/var/log/bandwidth /var/log
# rsync -vrplogDtH /oldHD/usr/local/frontpage /usr/local
# rsync -vrplogDtH /oldHD/var/spool/cron /var/spool
# rsync -vrplogDtH /oldHD/root/.my.cnf /root
# rsync -vrplogDtH /oldHD/etc/httpd/conf/httpd.conf /etc/httpd/conf
# rsync -vrplogDtH /oldHD/etc/sysconfig/network /etc/sysconfig


almost done.. now some configuration files need to be copied.

go to the old etc directory


# cd /oldHD/etc
# rsync -vrplogDtH secondarymx domainalias valiases vfilters exim* proftpd* pure-ftpd* passwd* group* *domain* *named* wwwacct.conf cpupdate.conf quota.conf shadow* *rndc* ips* ipaddrpool* ssl hosts /etc

Once this is complete run


# /scripts/fixeverything
# /scripts/upcp –force
# /scripts/easyapache
everything should be working fine now :) 

Thursday, July 8, 2010

Extended logging in Exim

1. Open /etc/exim.confRemove Formatting from selection


#vi /etc/exim.conf


2. Enter the following 


log_selector=+all


3. Save the file and change its attribute


# chattr + i  /etc/exim.conf


4. Restart Exim


# /etc/init.d/exim restart


Thats it! now check the exim log


# tail -f /var/log/exim_mainlog

Saturday, November 28, 2009

Enable Quota in VPS ( openvz )

If you are experiencing an issue with OpenVZ VPS disk quota, please make sure that the following values are set in the VPS conf.


VPS conf Location : /etc/vz/conf/VEId.conf


In the main node, do the following steps.


1) #grep DISK_QUOTA /etc/vz/conf/VEId.conf


If no disk quota value has found ot it is disabled, change the value to


DISK_QUOTA=yes


2) Check that disk quota is enabled in the main server itself.


grep DISK_QUOTA /etc/sysconfig/vz


If not enable the value to yes in the conf.


DISK_QUOTA=yes


3) Check for the value quotaugidlimit .


#grep -i quotaugidlimit /etc/vz/conf/veid.conf


4) Check the quota module "vzdquota" is loaded or notin main node.


# lsmod |grep -i vzdquota


5) You can set the value quotaugidlimit from the main node using the below command.


vzctl set veid –quotaugidlimit 500 –save


6) Make sure to reboot the mentioned node from the main node.


vzctl restart veid


7) Enter the the node for which you are experiencing the problem.


vzctl enter veid


Type the command 'mount'. It should give a similar output.


# mount
/dev/simfs on / type reiserfs (rw,usrquota,grpquota)
/proc on /proc type proc (rw)
/sys on /sys type sysfs (rw)
none on /dev type tmpfs (rw)
none on /dev/pts type devpts (rw)
none on /proc/sys/fs/binfmt_misc type binfmt_misc (rw)


Also make sure that symbolic links are existing from aquota.group and aquota.user to their respectve physical locations.


# ll
total 64
lrwxrwxrwx 1 root root 39 Oct 19 11:41 aquota.group -> /proc/vz/vzaquota/00000030/aquota.group
lrwxrwxrwx 1 root root 38 Oct 19 11:41 aquota.user -> /proc/vz/vzaquota/00000030/aquota.user