Monday, July 4, 2016

Nagios - Memory Check Plugin

Thought this might be of use to some one.

Originally sourced from Nagios Directory

Centos 7


#!/bin/bash
if [ "$1" = "-w" ] && [ "$2" -gt "0" ] && [ "$3" = "-c" ] && [ "$4" -gt "0" ]; then
FreeM=`free -m`
memTotal_m=`echo "$FreeM" |grep Mem |awk '{print $2}'`
memUsed_m=`echo "$FreeM" |grep Mem |awk '{print $3}'`
memFree_m=`echo "$FreeM" |grep Mem |awk '{print $4}'`
memBuffer_cache_m=`echo "$FreeM" |grep Mem |awk '{print $6}'`
memAvailable_m=`echo "$FreeM" |grep Mem |awk '{print $7}'`
memUsed_m=$(($memTotal_m-$memFree_m-$memBuffer_cache_m))
memUsedPrc=`echo $((($memUsed_m*100)/$memTotal_m))||cut -d. -f1`
if [ "$memUsedPrc" -ge "$4" ]; then
echo "Memory: CRITICAL Total: $memTotal_m MB - Used: $memUsed_m MB - $memUsedPrc% used!|TOTAL=$memTotal_m;;;; USED=$memUsed_m;;;; BUFFER/CACHE=$memBuffer_cache_m;;;; AVAILABLE=$memAvailable_m;;;;"
exit 2
elif [ "$memUsedPrc" -ge "$2" ]; then
echo "Memory: WARNING Total: $memTotal_m MB - Used: $memUsed_m MB - $memUsedPrc% used!|TOTAL=$memTotal_m;;;; USED=$memUsed_m;;;; BUFFER/CACHE=$memBuffer_cache_m;;;; AVAILABLE=$memAvailable_m;;;;"
exit 1
else
echo "Memory: OK Total: $memTotal_m MB - Used: $memUsed_m MB - $memUsedPrc% used|TOTAL=$memTotal_m;;;; USED=$memUsed_m;;;; BUFFER/CACHE=$memBuffer_cache_m;;;; AVAILABLE=$memAvailable_m;;;;"
exit 0
fi
else # If inputs are not as expected, print help.
sName="`echo $0|awk -F '/' '{print $NF}'`"
echo -e "\n\n\t\t### $sName Version 2.1###\n"
echo -e "# Usage:\t$sName -w -c "
echo -e "\t\t= warnlevel and critlevel is percentage value without %\n"
echo "# EXAMPLE:\t/usr/lib64/nagios/plugins/$sName -w 80 -c 90"
echo -e "\nCopyright (C) 2012 Lukasz Gogolin (lukasz.gogolin@gmail.com), improved by Nestor 2015\n\n"
exit
fi

Old Version


#!/bin/bash
if [ "$1" = "-w" ] && [ "$2" -gt "0" ] && [ "$3" = "-c" ] && [ "$4" -gt "0" ]; then
FreeM=`free -m`
        memTotal_m=`echo "$FreeM" |grep Mem |awk '{print $2}'`
        memUsed_m=`echo "$FreeM" |grep Mem |awk '{print $3}'`
        memFree_m=`echo "$FreeM" |grep Mem |awk '{print $4}'`
        memBuffer_m=`echo "$FreeM" |grep Mem |awk '{print $6}'`
        memCache_m=`echo "$FreeM" |grep Mem |awk '{print $7}'`
        memUsedPrc=`echo $((($memUsed_m*100)/$memTotal_m))||cut -d. -f1`
        if [ "$memUsedPrc" -ge "$4" ]; then
                echo "Memory: CRITICAL Total: $memTotal_m MB - Used: $memUsed_m MB - $memUsedPrc% used!|TOTAL=$memTotal_m;;;; USED=$memUsed_m;;;; CACHE=$memCache_m;;;; BUFFER=$memBuffer_m;;;;"
                exit 2
        elif [ "$memUsedPrc" -ge "$2" ]; then
                echo "Memory: WARNING Total: $memTotal_m MB - Used: $memUsed_m MB - $memUsedPrc% used!|TOTAL=$memTotal_m;;;; USED=$memUsed_m;;;; CACHE=$memCache_m;;;; BUFFER=$memBuffer_m;;;;"
                exit 1
        else
                echo "Memory: OK Total: $memTotal_m MB - Used: $memUsed_m MB - $memUsedPrc% used|TOTAL=$memTotal_m;;;; USED=$memUsed_m;;;; CACHE=$memCache_m;;;; BUFFER=$memBuffer_m;;;;"
                exit 0
        fi
else # If inputs are not as expected, print help. 
sName="`echo $0|awk -F '/' '{print $NF}'`"
        echo -e "\n\n\t\t### $sName Version 2.0###\n"
        echo -e "# Usage:\t$sName -w <warnlevel> -c <critlevel>"
        echo -e "\t\t= warnlevel and critlevel is percentage value without %\n"
echo "# EXAMPLE:\t/usr/lib64/nagios/plugins/$sName -w 80 -c 90"
        echo -e "\nCopyright (C) 2012 Lukasz Gogolin (lukasz.gogolin@gmail.com), improved by Nestor 2015\n\n"
        exit
fi
 

Thursday, December 10, 2015

Managing your Samba - Active Directory

So how do you  manage the samba active directory setup? does it have a front end?

The easiest way to administer an Active Directory is by using Microsoft RSAT (Remote Server Administration Tools) on a Windows machine.

"samba-tool" already contains many features for common administration jobs, but compared with the RSAT, it is still missing many options. Another big advantage of using RSAT, it increases the available documentation (books, online, etc.), because it's the common way Windows administrators are doing these tasks.

 Download and install RSAT from microsoft website and setup using - Add or remove windows programs feature from control panel.

Installation:

  •  Install RSAT using the downloaded installer
  • Open "Programs and Features" (use the "Start Menu/Metro search to locate the tool).
  • Open "Turn Windows features on or off"
Depending on the administrative tasks you want to perform, you choose the features to install. The following are recommended options to be installed for Samba Active Directory installations:

Most of the RSAT tools hide content and menu options in their default setting. To enable all features and display the whole content in each program, go to the "View" menu and activate "Advanced Features". Typically this option is only visible, when you've marked the root of the tree view.


Ref:


Hope this helps :)


Setup your free Active Directory in linux :)

Hey Guys!

So we had to decommission our Active Directory server as it was running on pretty old hardware and win 2003. With the cost factor involved we decided to give linux based domain controller a try. All my initial thoughts was to use ldap as thats what we normally refer to as AD alternative for linux, unfortunately things were not as easy as it seemed to be. we could only add linux machines or users to the ldap and the guy who manages the system ( who provisions machines and user accounts ) found it difficult to use ldap frontend.

So there started the search for something simpler and easy to manage and voila here comes SAMBA 4. Samba 4 ?? are you crazy its used for sharing files to windows machines how can you even compare it with Active Directory! its true :) I am just quoting the details from samba wiki here as its very much informative.

Things to look out for

1. DNS - super important as everything depends on how dns setup is configured. So extra care needs to be done while this is setup. Almost 90% of issues arises due to incorrect DNS setups
2. Use of static IPs instead of dhcp.

Explanations for the links shared below.

1. This one pretty much helps you setup the primary DC
2. The second link helps you to setup a failover/setup

Ref:

1. Setup a Samba Active Directory Domain Controller
2. Join an additional Samba DC to an existing Active Directory
3. Check and fix DNS entries on DC joins

Hope this helps ;)

Check out the blog for more details on how to manage the Samba DC from a windows machine like you do with Active Directory.

Monday, August 31, 2015

Python + pkg_resources.DistributionNotFound:

This usually occurs if your python setuptools are old version. I tried upgrading them and the errors are gone :)

pip install --upgrade setuptools

For those who want the latest stable version use the above command or you can try yum to install python-setuptools

Hope it helps! 

error: Python.h: No such file or directory

Okay guys so I was trying to install locust using pip and the installation was failing due to the following error.

"error: Python.h: No such file or directory"

Found out that the python devel package was not installed and hence the error. So I installed the devel package and voila.. things were back on track :)

So in general if you find that something.h file is missing or not found, it usually means that the devel packages are not installed.

#yum install python-devel

Hope this helps someone :)

Friday, November 7, 2014

system failure: POST failed, status=413 upload too large: file '/': upload too large -- Restoring Large Zimbra backups

Okay so zimbra account restoration for large accounts ( above 1GB ) was not working for me. the following steps helped to restore large accounts.

What you need to do is  to change parameter rest_request_max_upload_size to a larger value. Here we will change it to 10GB.

# su zimbra
# /opt/zimbra/bin/zmlocalconfig -e rest_request_max_upload_size=10737418240
#  zmmailboxdctl restart
# exit

Then run the import backup account like this as root user.

# /opt/zimbra/bin/zmmailbox -z -m "email@domain.com" postRestURL "//?fmt=tgz&resolve=reset"  backupfile.tar.gz

Thanks to Andrea for the tip :)

ref url: LINK

Wednesday, August 20, 2014

Ruby installation issue with openssl

So i was trying to install ruby 1.87 and the compilation broke due to openssl issue. The error was something like this.

ossl_pkey_ec.c: In function ‘ossl_ec_group_initialize’:
ossl_pkey_ec.c:761: warning: assignment makes pointer from integer without a cast
ossl_pkey_ec.c:815: error: ‘EC_GROUP_new_curve_GF2m’ undeclared (first use in this function)
ossl_pkey_ec.c:815: error: (Each undeclared identifier is reported only once
ossl_pkey_ec.c:815: error: for each function it appears in.)
make[1]: *** [ossl_pkey_ec.o] Error 1
make[1]: Leaving directory `/usr/local/src/ruby-enterprise-1.8.7-2012.02/source/ext/openssl'
make: *** [all] Error 1
So applied this patch to the openssl file in the extracted ruby source and finally the compilation was successfull. You will need to specify the location of the ossl_pkey.ec.c file in the below file or you can mention it while patching.


--- ruby-1.8.7-p374/ext/openssl/ossl_pkey_ec.c  2010-06-21 04:18:59.000000000 -0500
+++ /root/ruby-1.8.7-p374/ext/openssl/ossl_pkey_ec.c    2013-12-10 13:30:18.919963527 -0600
@@ -757,8 +757,10 @@
                 method = EC_GFp_mont_method();
             } else if (id == s_GFp_nist) {
                 method = EC_GFp_nist_method();
+               #if !defined(OPENSSL_NO_EC2M)
             } else if (id == s_GF2m_simple) {
                 method = EC_GF2m_simple_method();
+               #endif
             }

             if (method) {
@@ -811,8 +813,10 @@

             if (id == s_GFp) {
                 new_curve = EC_GROUP_new_curve_GFp;
+               #if !defined(OPENSSL_NO_EC2M)
             } else if (id == s_GF2m) {
                 new_curve = EC_GROUP_new_curve_GF2m;
+               #endif
             } else {
                 rb_raise(rb_eArgError, "unknown symbol, must be :GFp or :GF2m");
             }

Change your location to the ruby source directory and save the contents to a file named patch.txt. then issue the following command to patch.

#patch < patch.txt

Hope this helps :)

Wednesday, August 6, 2014

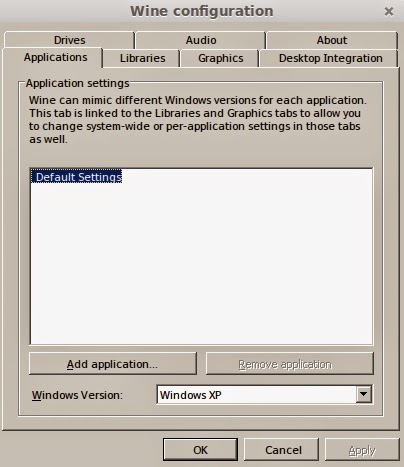
For those who have Issues running Microsoft Office 2007 on Wine.

So I had to remove my windows altogether and run linux. I choose the latest stable release of Mint 17, i need to have ms office installed and figured out the wine package should handle this fine. however it was not smooth as i thought.

Installation was fine. But the excel and power point was not opening and had trouble. So here is something that I did made it work for me.

1. Open the wine configuration ( gui --> Configure Wine ) and select the windows version to be "windows xp"


2. Check the libraries tab next, you will need to add  a new override for the library, choose "riched 20" and click add. Then you need to edit this newly added override and change the load order to "native ( windows )" 

 
 Apply the wine configuration and then try launching the powerpoint or excel, it should work :)


Monday, August 26, 2013

Nagios - Hosts Disappear

Well I had configured my nagios setup and everything seemed to be fine, then i noticed something strange! The hosts keep disappearing time to time. They do come up at an odd time but not always. Well lot of time was spent on configurations analyzing what went wrong and what ! no LUCK!! :(

So to all those who has this problem, here's something that you might want to check for. Such an issue arises due to more number of nagios PIDs, ie the shutdown of previous nagios was not proper and that PID is messing up with the new one. So to troubleshoot stop nagios, check for orphaned PIDs.. kill it and start nagios again. Voila the hosts started appearing with no issues again!! :)

[root@server ~]#    ps -ef | grep -i  nagios
nagios   23581     1  0 Aug22 ?        00:00:00 /usr/local/nagios/bin/nagios -d /usr/local/nagios/etc/nagios.cfg
nagios   24686     1  0 Aug19 ?        00:00:01 /usr/local/nagios/bin/nagios -d /usr/local/nagios/etc/nagios.cfg
root     29749 27976  0 07:14 pts/0    00:00:00 grep -i nagios

[root@server ~]#    /etc/init.d/nagios stop

[root@server ~]#     ps -ef | grep -i  nagios
nagios   24686     1  0 Aug19 ?        00:00:01 /usr/local/nagios/bin/nagios -d /usr/local/nagios/etc/nagios.cfg
root     29760 27976  0 07:14 pts/0    00:00:00 grep -i nagios

[root@server ~]#     kill -9 24686

[root@server ~]#     ps -ef | grep -i  nagios
root     29762 27976  0 07:14 pts/0    00:00:00 grep -i nagios

[root@server ~]#     /etc/init.d/nagios start
Starting nagios: done.

[root@server ~]#     ps -ef | grep -i  nagios
nagios   29791     1  0 07:14 ?        00:00:00 /usr/local/nagios/bin/nagios -d /usr/local/nagios/etc/nagios.cfg
root     29795 27976  0 07:14 pts/0    00:00:00 grep -i nagios

Thursday, June 6, 2013

Hard Disk Cloning - Data Recovery

Okay, you can use various Linux commands that can be used to clone the hard drive. This can be helpful while recovering data.

 dd

The simplest program to clone.

Usage:

dd if=/dev/sda/ of=/dev/sdb

It will copy partition table and boot loader and all partitions within this disk

Here "if" option specifies your input and "of" specifies your output.
Make sure that both hard disks are of the same size.

How to get the status of disk cloning. Open a new terminal and issue the following commands.

# pgrep -l dd
56452 dd

# kill -USR1 56452 

Here the first command will out put the process id of the dd command and the second command will make dd throw the output in the same shell where its running.

Hope it helps.